

Consider the use case where you have data partitioned by months in DynamoDB, where most of the writes occur in the current month (hot partition), and past months are kept only for the occasional read or a historical lookup (cold partitions), similar to the design of tables suggested by AWS Guidelines for working with DynamoDB tables. However, due to changing requirements or evolution of your service you now have a need to take all the data in for example, the past year and copy it into one index table for faster lookup. While we can use Global Secondary Indexes for each monthly table, making just one call to a DynamoDB table is more optimal and performant than making 12 lookups to each monthly table. Global Secondary Indexes also need additional maintainence overhead, which is always a disadvantage.
The Problem
For the ease of following through, I will extend the examples from AWS documentation (it’s not the best, but bear with me). Here is our table with the following modified schema:
PRIMARY KEY: CustomerID, string
SORT KEY: DateTime, integer or stored as Joda time string
          (my example will be as a string)
Other colums:
  - URLClicked, string -> to track the URL clicked by the customer
  - OrderID, string -> to track the order ID if the customer purchased something
  - ProductID, string -> to track the ProductID of the item displayed
2 years have passed and you now have tables named in this schema. As you’ve followed DynamoDB’s best practices, and now your business has managed to scale and is now very successful. Here’s what your tables look like (in addition to being differentiated by each region and stage).
CustomerTracker-201501
CustomerTracker-201502
...
CustomerTracker-201704
CustomerTracker-201705
Now you’re planning to run a 2-year surprise anniversary sale that will immediately apply a discount of 5% at checking out, or perhaps even a 10% loyalty discount for customers without the need for a coupon code. To qualify for the surprise anniversary sale, the customer must have purchased an item in the last 2 years, or to qualify for the loyalty discount, the customer has to have bought an item within the past 3 months. As your data model when you started was successful and you never really thought that your webstore will be so successful that you want to thank your customers for their support, you did not have a better table schema that would allow you to check if the customer has purchased something within between 2015 January and 2017 January.
What you can do is, when the customer checks out, programmatically check the past 24-months of data to see if they have purchased an item (order ID exists) and then apply the discount. However, this would require 24 calls to DynamoDB, and would increase the time it takes to calculate the cost at checkout. You’ve read some online article about improving your checkout experience, and that possibly, an increase in checkout page load time might lead to less customers willing to buy your product. (Seriously, it’s not a good idea to have the people that want to give you money wait on a spinning wheel of a loading screen.)
How you can improve this is to export/backfill all data to yet another dynamoDB table, and perform one call to determine if/when the customer purchased an item, and apply a discount based on that. While you could write a script that will slowly and steadily get all entries of customer IDs that have an order number and write them to a new table, you want it fast, and you don’t want to reinvent the wheel. It’s also 2017 and AWS should have tools to make this an easier experience (spoiler alert: there are tools!).
What would the new table schema look like?
Table Name  : AnniversaryPromo
PRIMARY KEY : CustomerID, string
Sort Key  : DateTime, integer (you'll see why this should be an integer in a bit)
Other column: OrderID, string (that is not null if they have purchased something)
            : ExpirationTimeStamp, integer.
Such was the requirements I had in a project I worked on. Summarized a list (because people don’t read long paragraphs anymore):
- Only certain columns of up to 12-months worth of data was needed for this lookup. That is, I would need to ‘massage’/transform the data persisted and only use certain columns.
- Rather than making 12 (or more) Query calls to 12 DynamoDB tables partitioned by month, only one call can be made to reduce expensive lookups and further reduce latency.
- The data totalled to over 100GB spread out over monthly tables. Also, all the tables had an the exact same primary key and sort key schema.
- While the data stored in monthly tables cannot be deleted, this ‘index table’ only required data to be persisted only up to a year. Hence allowing us to use Time-To-Live.
I found multiple helpful resources on how to achieve this with the use of Amazon EMR and Apache Hive, but there were none that showed me how to massage the data I was exporting.
In addition, while I read multiple tutorials on how to export data from DynamoDB to S3, and then transform the data before importing it back into a new DynamoDB, there was also no guide on how to directly copy from multiple DynamoDB tables without the need for an intermediate step of saving to DynamoDB. This guide will discuss:
- How to export between multiple DynamoDB tables to one DynamoDB table.
- How to perform this export of only specific columns in the DynamoDB.
- How to do this with Amazon EMR (which uses Apache Hive).
- If the data only requires primitive transformation (in this specific example, calculating a Time To Live based on the creation DateTime), leverage in-memory transformation, saving the need to copy out to S3 or HDFS.
Why Amazon EMR or Apache Hive? While some may think this is overkill, consider this at an even larger scale. While I could write my own extract and tranform code that will interface with DynamoDB to achieve this task on a single machine, it would take an even longer amount of time, particularly if the dataset was larger than 100GB, think in terabytes or even petabytes of data.
The Steps
0. Get your code in Production to start writing to this table correctly.
Just a reminder that you’ll want to first design, implement and deploy your application to start writing to this new yearly table first before you ‘backfill’ past data using Amazon EMR, else you’ll always have to backfill monthly for this rolling promotion.
1. Set up Amazon EMR.
Amazon’s tutorial on this is pretty complete: [link to Amazon EMR tutorial]
The tutorial will show you how to create and provision a cluster via their web console, as well as create an SSH keypair for use in connecting to your cluster. (the keypair restricts access to only those with the private key generated for you/your team).
Go ahead and follow the tutorial up till step 3 (where the tutorial asks you to add a Step via their UI, then come back here).
However, I’ll mention a few caveats I had to deal with, with regards to connecting to the cluster.
1a. Setting up for SSH access goes more than just requiring the key-pair.
While initially I assumed that simply having an EC2 Keypair was sufficient to connect to my EMR cluster, it seems that you need to enable all inbound connection attempts on port 22.
Once you’re on step 3 where your cluster is now provisioned, here’s what else I had to do:
Under EMR Dashboard > Security Groups > your master node’s security group:
Add an INBOUND SSH TCP rule to the master security group on Port 22, with source being 0.0.0.0/0.
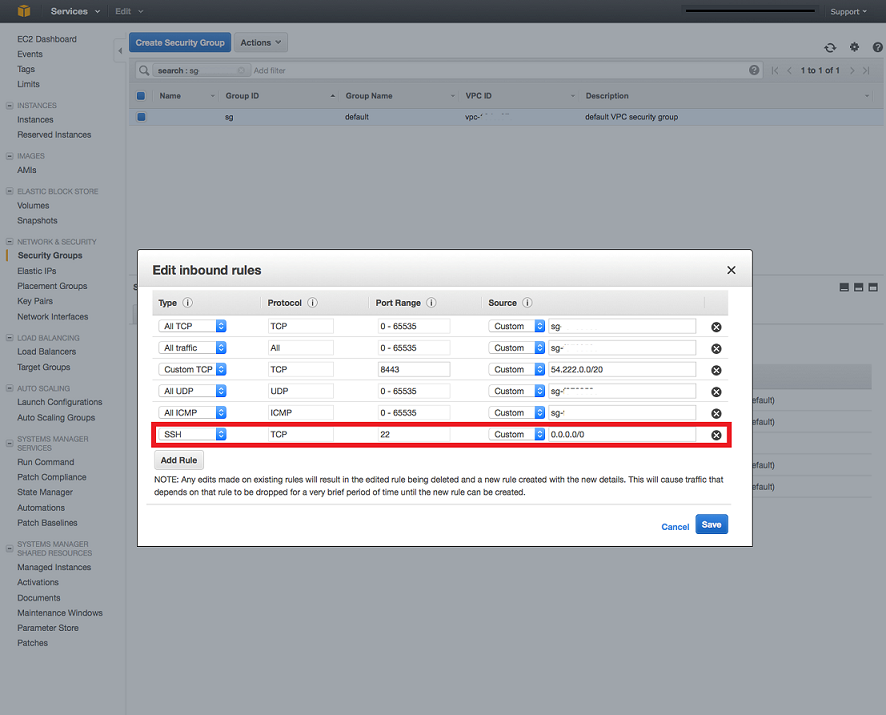
This will allow you to actually SSH into your cluster with your keypair. Well it does more than that actually, it allows access from ANY source. So if your keypair gets compromised or stolen, then the attacker will have full access to your cluster.
While you can also whitelist by IP address, my IP addresses are usually dynamically allocated, so this isn’t an option. As long as I’m careful with my keypair.
Don’t forget to also set the correct permissions for your keypair, which the documentation should have correctly advised you when creating one.
Addtionally, checkout IAM policies for restricting access to only those that actually need it.
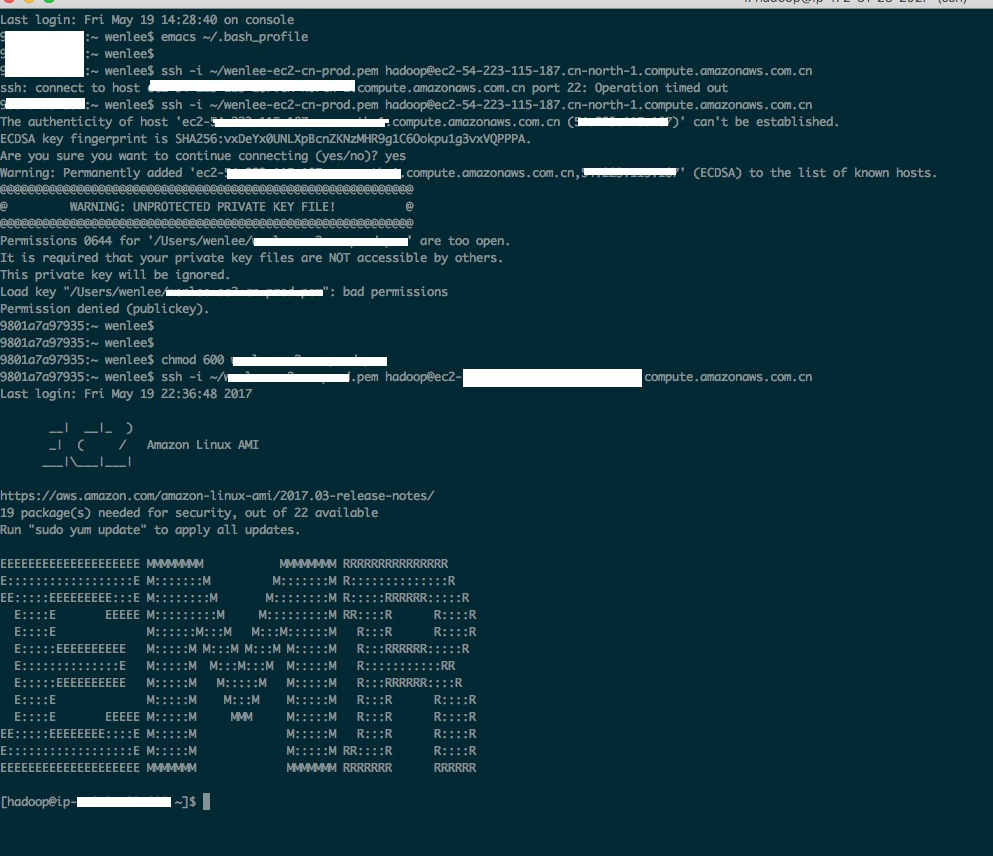
^You can see from the above screenshot I managed to SSH in and not have my port time out on me after editing inbound rules.
2. Write the script that does the exporting and transformation of the data.
We need to map the data schema of the monthly DynamoDB tables in Apache Hive, after which we need to copy it to the destination data schema, and perform some simple transformations if need be. This can be acheived via the use of DynamoDB connectors. (ah the perks of being under Amazon’s ecosystem of web services)
In the example script below I also transform a String DateTime into a Unix Epoch time. The reason for this is to make use of DynamoDB’s Time to Live. This way I can manually set records within that table to remain for a certain
number of time, which in this example is a year (anniversary promo). This will ensure old data is automatically deleted from DynamoDB tables and I won’t have to manually scan the table to remove old data.
Without further ado, here’s the script:
-----------------------------------------------------------------------------------------------------------
-- Script to migrate data from monthly tables into one table.
--  filename: dynamotodynamo.hive
--  author: leewc
--  Instructions:
--    Run: hive -hiveconf domain="Devo" -hiveconf region="NA" -hiveconf yyyymm=201604 -f dynamoTodynamo.hive
--    Variables passed from bash are accessible via hiveconf.
--    Variables are case-sensitive i.e test != Test
------------------------------------------------------------------------------------------------------------

-- start with a clean slate.

DROP TABLE src_table_db;
DROP TABLE dst_table_db;

-- set time to live (expiration date for queries) in seconds. (one year in this example)
set hivevar:ttl = 31536000;

-- set read and write percentage capacities
SET dynamodb.throughput.write.percent = 10;
SET dynamodb.throughput.read.percent = 0.5;

!echo "Read Write Capacity Percentages set.";
!echo "USING DOMAIN: ${hiveconf:domain} REGION: ${hiveconf:region} ";
!echo;

-- note that in column mapping it's left side to right side: [ HIVE_COLUMN -> DDB_COLUMN ]

CREATE EXTERNAL TABLE src_table_db (CustomerID string, DateTime string, URLClicked string, OrderID string, ProductID string)
STORED BY 'org.apache.hadoop.hive.dynamodb.DynamoDBStorageHandler'
TBLPROPERTIES ("dynamodb.table.name" = "CustomerTracker_{hiveconf:domain}_${hiveconf:region}_${hiveconf:yyyymm}",
	       "dynamodb.column.mapping" = "CustomerID:CustomerID,DateTime:DateTime,URLClicked:URLClicked,OrderID:OrderID,ProductID:ProductID");

-- In the above table properties you can also perform mapping to columns that are differently named between Hive and DynamoDB,
--  but in this example there's no need to.

!echo "CREATED SOURCE TABLE.";
!echo;

CREATE EXTERNAL TABLE dst_table_db (CustomerID string, CreationDateTime bigint, ExpirationTimestamp bigint, OrderID string)
STORED BY 'org.apache.hadoop.hive.dynamodb.DynamoDBStorageHandler'
TBLPROPERTIES ("dynamodb.table.name" = "${hiveconf:domain}_${hiveconf:region}_AnniversaryPromo_2017",
	       "dynamodb.column.mapping" = "CustomerID:CustomerID,CreationDateTime:CreationDateTime,ExpirationTimestamp:ExpirationTimestamp,OrderID:OrderID");


!echo "CREATED DESTINATION TABLE. Describing all tables.. ";
!echo;

DESCRIBE src_table_db;
!echo;
DESCRIBE dst_table_db;

!echo "Starting the copy ... ";
!echo "Using a Time to Live value of ${hivevar:ttl} for the expiration date.";
!echo;

-- Parse the CreationDateTime from Joda human time to epoch and also do this for the expiration with the additional TTL.
--- We are effectively copying the data, then transforming it on the fly to get ExpirationTimeStamp and CreationTimeStamp in the right format, this will allow for TTL.
--- We lose some accuracy when converting to epoch as the format stored is in Joda time and the built-in Hive functions do not support that.
--- We can get around the formatting issue by loading a custom Joda time UDF, but it's more trouble than it's worth right now for this use case. See https://github.com/lithiumtech/yoda-time

INSERT OVERWRITE TABLE dst_table_db
SELECT CustomerID,
       unix_timestamp(StartDateTime, 'yyyy-MM-dd') as CreationTimeStamp,
       unix_timestamp(StartDateTime, 'yyyy-MM-dd') + ${hivevar:ttl} as ExpirationTimeStamp,
       OrderID
FROM src_table_db
WHERE length(OrderID) > 0;

-- Optional: Add a WHERE length(CustomerID) > 0, to guard against any possibility of inserting a null value into the primary key
-- of the destination field. I don't need to do this in this example as the customerID is the primary key in the source table
-- and is impossible to have any null fields in the Primary key field of the source table to begin with.
-- In addition to that, you can add other filters such as you want URL

!echo "INSERT COMPLETE.";
!echo "Backfill complete.";
Here’s the Gist for both scripts used in this example.
Small caveat:
If you noticed in the script above the DynamoDB read and write percetages are not the same. While the documentation states that a write value of 0.5 would correspond to letting Amazon EMR use up to 50% of the tables write capacity,
I found this to be false in my use case. I did a quick Google search and got results about EMR workers were single threaded workers and don’t do a batch write StackOverflow link,
or how the hash key was not distributed enough, which was also not the case for my actual project. I even attempted to increase the number of parallel mappers as suggested by the docs, and
read about tuning the number of reducers manually instead of letting Hive decide, as well as setting hive.exec.parallel to true and tweaking hive.exec.parallel.thread.number
from this article’s findings and this SO question.
Nothing worked. I was still copying data at a very slow speed. To copy 100MB of test data took over 2 hours. It also doesn’t help that running operations like these in the command line doesn’t report overall percentage progress. I believe it’s an efficiency optimization, where Hive doesn’t need to waste time iterating through data the first pass to give an accurate estimate, since for many use cases the data being processed are terabytes in size.
Here’s a sample:
Status: Running (Executing on YARN cluster with App id application_1492647009376_0003)

------------------------------------------------------------------------------------------
VERTICES      MODE        STATUS  TOTAL  COMPLETED  RUNNING  PENDING  FAILED  KILLED
------------------------------------------------------------------------------------------
Map 1      container     SUCCEEDED  4          4        0        0       0      0
------------------------------------------------------------------------------------------
VERTICES: 01/01  [==========================>>] 100%  ELAPSED TIME: 32327.44 s
------------------------------------------------------------------------------------------
OK
Time taken: 32331.327 seconds
The table was only around 8 GBs, it took over 8 hours to copy. I looked at the CloudWatch metrics and noticed despite a high read throughput usage, the write was very very small.
What finally worked was setting the percentage value of the write to something larger than 1.0. I have reason to believe it’s a bug in this version of Amazon EMR, where for the write percentage it’s actually not from a scale of 0.0 to 1.0, but from 1 to 100. Interestingly this wasn’t
an issue for read, in fact, attempting to set the read to higher than 1.0 will overconsume whatever capacity you have set up, which will impact the read latencies of your application in Production. A big no no.
You should test it out in development stage tables first, and find the right percentage you’ll use based on traffic as well. Perhaps even increase the capacities, I stuck with 0.5 (50%) read since I noticed at peaks the application never took more than 40% of our provisioned capacities. As for writes I took a
conservative 10% since I’ve already began writing to this table in Production. During non-peak hours for certain tables I went up to 50% as well, it really is dependent on your situation.
Here’s the configuration details of the version I used, in case you run into the same version:
Configuration Details
Release label: emr-5.5.0
Hadoop distribution: Amazon 2.7.3
Applications:
   - Ganglia 3.7.2
   - Hive 2.1.1, Hue 3.12.0
   - Mahout 0.12.2
   - Pig 0.16.0
   - Tez 0.8.4
After I bumped up the write capacity percentage I was able to crunch ~28GB of data in under 4 hours, while production traffic was using about 50% of the write capacity.
3. Test your Hive script on one monthly table
From the script above, this is how you test your script on one specific table.
hive -hiveconf domain="Devo" -hiveconf region="NA" -hiveconf yyyymm=201604 -f dynamoTodynamo.hive
This will begin the copy operation from table CustomerTracker_Devo_NA_201604, perform the transformation and write to the Devo_NA_AnniversaryPromo_2017 table.
(the tables have to exist before hand)
From the above example, you can see that using the -hiveconf flag for each key-value pair allows us to pass variables to Hive via the shell executing it.
This way we can avoid hard coding all the monthly table values over. Another reason for using Hive Configs is also mentioned right below in the next step.
4. Hack up a bash script to execute your script for all tables.
Why would you need a bash script? Well the other reason is to be able to automate and ‘loop’ through all the monthly tables you intend to copy over. I couldn’t find a simple way to loop through an array of strings that would hold the months I want to copy, aside from manually copying and pasting the script to work for multiple months. A StackOverflow Q&A gave me the idea to just use a Bash script, being the fastest and most painless way.
However, this does yield 3 downsides:
- One monthly table at a time, so I could not parallelize Hive to copy from multiple monthly tables at once this way. I could however have multiple instances of the script running for different tables. (However I did not do so since I had production traffic writing to the yearly table simultaneously)
- In the event of one table failure (perhaps the table had bad data, or we ran out of capacity), we will have to start from scratch for that monthly table that failed. (This is mitigated by having logs to keep track of which table went wrong to avoid wasting capacity)
- Unable to use the step flow GUI within AWS Dashboards, however, the disk/network IO CloudWatch metrics can still be used just fine.
Here is the script I used to loop through all the tables. Feel free to use it.
# Filename: startDynamoDBTableExport.sh
# Author: leewc
# This script copies the specific columns in the monthly CustomerTracker tables to a new yearly table for anniversary promotions.
# This is used in conjuction with the dynamoTodynamo.hive script.
# Note: You may need to provide execute permissions to run this script. [ chmod +x startDynamoDBTableExport.sh ]
# You will have to explicitly specify the domain, region and months in this file. This is by design to avoid
#  copying the wrong data between regions.
#
#!/bin/sh

months=(201705 201704 201703 201702 201701 201612 201611 201610 201609 201608 201607 201606 201605)
domain="Devo"
region="NA"

function _start() {
    for month in ${months[@]}
    do
        echo "Beginning Hive Copy for CustomerTracker_${domain}_${region}_${month}".
	hive -hiveconf domain=${domain} -hiveconf region=${region} -hiveconf yyyymm=${month} -f inflight-dynamoTodynamo.hive
    done
}

echo "This will run dynamoTodynamo Hive script for " ${domain} " and " ${region}
echo "With the following months: "
echo ""
echo ${months[*]}
echo ""
while true; do
    read -p "Are you sure this is what you want (Y/N)? " yn
    case $yn in
        [Yy] ) _start; break;;
        [Nn] ) echo "Aborting operation."; exit;;
        * ) echo "Please answer yes (Y) or no (N).";;
    esac
done
Here’s a Gist for both scripts.
5. Run your script on your cluster.
Throughout the development of my script and interacting with my Amazon EMR cluster, I experienced frequent disconnects (broken pipe) from the cluster, way more than
what I experience while working on EC2 instances. It could be the keep alive settings were not configured correctly or there is just a possibility of a flaky connection causing high
packet loss and hence SSH terminating the connection. I alleviated this by running screen before executing my Hive data copy.
$ screen
$ ./startDynamoDBTableExport.sh
Whenever I get disconnected (or have to leave and work on other things), I can always return with screen -r after SSH-ing into my cluster.
Quick tip on saving the output: I initally used the screen -L option to save all output, but this causes a HUGE output file since each animation of the slider bar
(it shows when you start Hive in a window at a certain size) gets logged per second. What you would want is actually after the operation is complete, or whenever you want to save the output,
go into command mode with Ctrl + A + : then type hardcopy -h filename. Thanks to this answer.
Lastly I also did not have success with copying tables using an EMR cluster in another region, (e.g: from US to China, or in the EU region) and had to spin up a separate EMR cluster in that region to perform the table copies.
6. Set up TTL
If you read through the script for this article, you’ll notice the use of TTL for ExpirationTimeStamp, in which I have added a total of 31536000 seconds, which is a year. The reason for this is to use TTL provided by DynamoDB, in which the records
will be deleted once the epoch time has reached the value specified in that row. You can learn how to turn on Time to Live here, which I have also linked previously. AWS provides
a very nice ‘preview’ option, that will attempt to show you which records will be deleted once a certain date is met, a good validation step! Once TTL is on, you’ll have a self managing table that has a rolling window of data, completely automated and
removes the need to write a sweeper script to remove old data.
PS: There’s no use for the CreationTimeStamp other than for maintainability and debugging. In my example I have it as the sort key, but you can very well use the ExpirationTimeStamp as a sort key as well. Consider removing it if you’re trying to save costs on Read/Write capacities.
I for one have kept it there for debugging and operations, and perhaps it will be of some use in a future use-case (though unlikely, and we should always design software being minimal, yet extendable for the future.)
7. Profit !
Now you can write up your own DAO (data access object) to make ONE query call to that table (a GET call won’t work since the sort key is by DateTime, which do not have, or you could also use a random UUID to ensure uniform distribution and access across all the partitions in the tables). This will eliminate the need to check all tables and make multiple calls, increasing performance.
Hmm, last thing, what if the transformation capabilities of Hive is not sufficient for my use case?
Well, then consider looking at Pig + Python, it provides a more programmatic and procedural method of reading the extracted data (you’ll have to store it temporarilly in an S3 datastore), and performing more complex transformations, before putting the data back using a similar hive script above.
That’s all for this post! It took me awhile to get it out the door (started writing on and off on 2017-04-26), so in the future I’ll make it a point to document/write immediately once my project is done and not put it into a large backlog of TODOs. Till then.