
This guide was originally written back in August 2015, I finally got around to updating and publishing it! Talk about procrastination and life.
Why.
Awhile back I’ve been wondering what I stand to lose if my laptop ever got stolen.
I realized that I stand to lose a lot. I’m sure everyone does. Ever more so with the current state of surveillance people are more concerned about data privacy.
By having a large chunk of my digital life stored on my laptop, in the event of it being stolen, not only will I stand to lose important personal data, I would also lose many photo memories. The obvious solution would be to make backups so that I had a copy. But how about stopping others from getting access without a password?
The existing solutions usually employ some form of encryption, that completely stores all the files in an encrypted container. This works great, except when I need my data accessible elsewhere, like syncing on Dropbox. What ends up happening is that the entire encrypted file gets stored in the cloud, and I wouldn’t be able to access it elsewhere without decrypting it. the entire physical harddisk, or the entire partition, but I run a dual-boot set up and I’m paranoid enough that some Windows update can erase/break a bootloader or damange a volume, leading me to lose all my encrypted data. Obligatory xkcd comic on security
What I want instead is to secure my data in a way that does not hamper my access to it, meaning still have Dropbox/Copy syncing the unencrypted files. This would keep my data safeguarded when my laptop gets stolen, and at the same time have access to the original files elsewhere. I also want to only type in the password at boot-time, and have a ‘transparent’ system (where encryption does not get in the way). After some Googling and thinking, I’ve found the solution on GNU/Linux.
What.
This tutorial will guide you on how to set up a virtual disk that is encrypted with an industrial grade cipher, and then go one step further by showing you how to have it mount at boot time. This has quite a few advantages:
- Encryption of sensitive files are a great peace of mind when your computer gets stolen.
- Disk is only decrypted when the correct password is entered when the volume is mounted at boot.
- Encrypted disk looks like a regular disk to applications and the rest of the file system so you can use it like any other disk.
- This allows for individual file syncing on your Dropbox and also easy access elsewhere.
Like two sides of the sword, though, there are disadvantages:
- This will only work on Linux based systems, Windows and Mac OSX have some support, but they aren’t official implementations.
- You assume Dropbox/Google Drive/cloud service is actually encrypting your data and you trust them. (because unencrypted files are kept there)
- If you do install and use Dropbox on multiple non-Linux OSes, and you dual-boot, you’d either need 2 sets of identical files, or somehow have the second OS (Windows/Mac) auto-mount the encrypted volume (LibreCrypt?), something I have yet to try.
- Disk is left accessible if you resume from hibernation or sleep, as the key has already unlocked the volume, of course, a power loss/force shutdown will protect you.
I’ll be using a fresh install of Debian 8, the process is the same for any Debian based system like Ubuntu. This guide is also a mash up of 2 excellent tutorials, Digital Ocean’s How to Create an Encrypted Volume on Ubuntu VPS as well as CyberCiti’s LUKS HDD Encryption Guide.
Our current state of affairs are that we have a Debian based GNU/Linux install, we want to create an encrypted file container that auto-mounts at boot as a virtual disk, possibly in a multi-boot environment.
After writing this awhile back I also tested it on my laptop with an install of Ubuntu 14.04 LTS too, so don’t think this is just exclusive to Debian. Also, if you’re worried by the length of this article, it’s not that daunting, I’, just very thorough documenting this.
Let’s begin.
Note: This guide uses sudo which isn’t installed by default on Debian.
How.
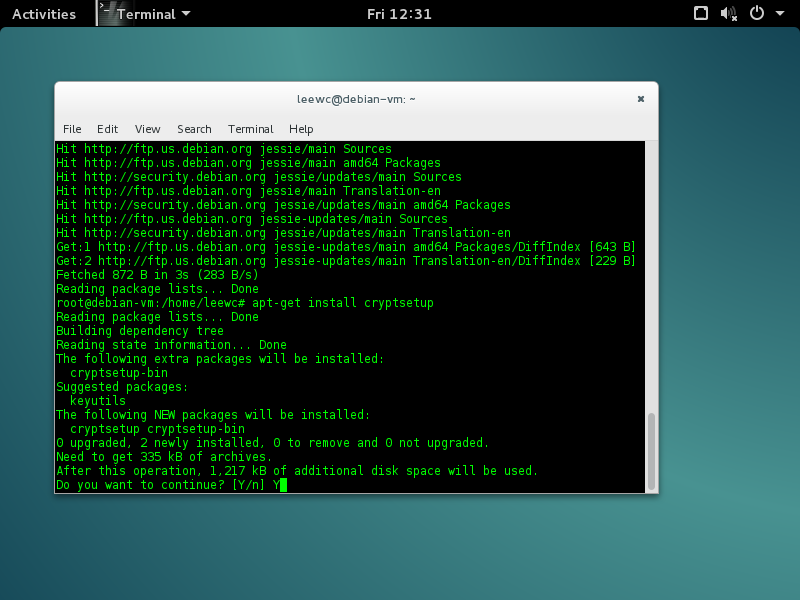
1. Install dm-crypt tools.
This is simple, run these 2 commands:
$ sudo apt-get update
$ sudo apt-get install cryptsetup
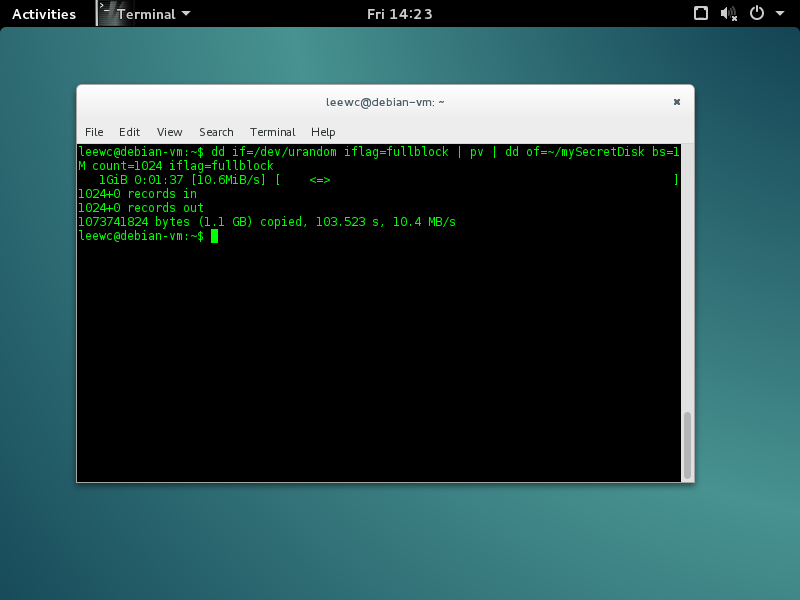
2. Create an empty file with allocated space.
Go ahead and find a location to store your container, and then execute the following command.
$ dd if=/dev/urandom of=/pathtoNew/mySecretDisk bs=1M count=1024
Here count is the size of the virtual disk, and bs would be block size (how much should dd copy over each time), use root or sudo if you need the appropriate write permissions for your location.
Also, if you are less paranoid and want to speed things up, use if=/dev/zero which will just write bunch of zeros to the file, or if you’re super paranoid use if=/dev/random instead of urandom for
even more entropy. There is a debate on if this is more secure though, either way it’ll take awhile (took me 12 minutes for an 8GB file on a single core VM).
Note on the block size and count, as total size of file = block size * count.
4GB = 1M blocksize * 4096
Tip: Use ‘pV’ (install with apt-get) to view the progress if you’d like, like so 1:
$ dd if=/dev/urandom iflag=fullblock | pV | dd of=~/mySecretDisk bs=1M count=1024 iflag=fullblock
3. Create a dm-crypt LUKS container.
Next we’ll create a container inside this file and then format the container with a filesystem. Using the Linux Unified Key Setup (LUKS) we can set up the standard encryption that will be used to store our data.
$ sudo cryptsetup -y luksFormat ~/mySecretDisk
Notice how I forget to add sudo or perform the process as a root user in the screen, I get command not found? Also, make sure you go ahead and type uppercase YES, else the process will quit.
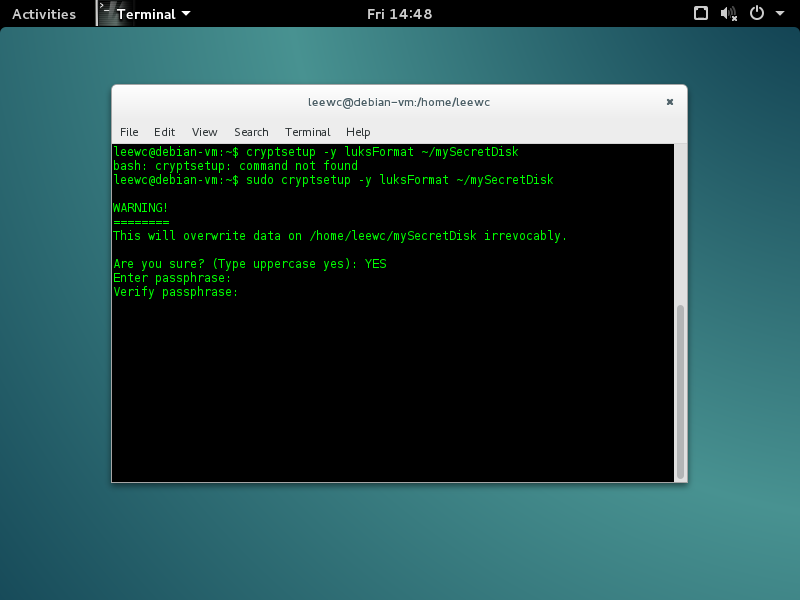
If you run file mySecretDisk now you should see that it is a LUKS Encrypted file, with a nice UUID (yay). You probably also want to remember that passphrase, unless uh, you want to lose access to your files.
If you didn’t see that the file is a LUKS Encrypted file, then you didn’t do step 3 right, brother, it’s okay, I made this mistake too the second time.
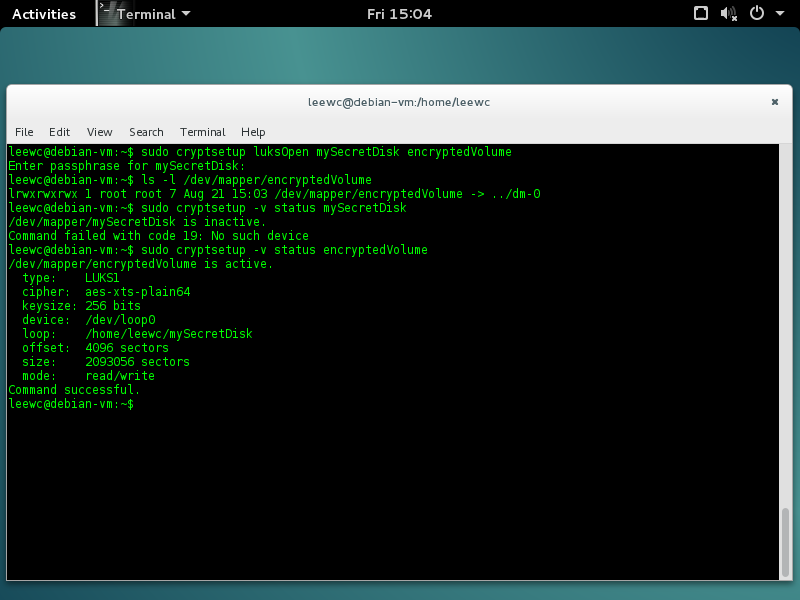
4. Open the container and create a mapping.
Go ahead and open the container with:
$ sudo cryptsetup luksOpen ~/mySecretDisk your_mapping_name
In my case I’m calling it encryptedVolume. You’ll be asked for that passphrase. (you still remember it, right? Also, Obligatory xkcd comic on passwords.
After which you should get no output, and execute the following if you want verification you’ve mapped it correctly and opened the container.
$ ls -l /dev/mapper/your_mapping_name
$ sudo cryptsetup -v status your_mapping_name
Sample output:
$ sudo cryptsetup -v status encryptedVolume
/dev/mapper/encryptedVolume is active.
  type:    LUKS1
  cipher:  aes-xts-plain64
  keysize: 256 bits
  device:  /dev/loop0
  loop:    /home/wclee/secretCow
  offset:  4096 sectors
  size:    405504 sectors
  mode:    read/write
Command successful.
5. Create a filesystem and mount.
Go ahead and use this like any other volume, format it with GParted, or the disk utility too if you don’t want to use the command line. It shows up as a loopback device, and can even be detected as a LUKS partition already. NTFS if you plan to let Windows access this and more than 4GB files, else ext4 is a standard for Linux filesystems. Use FAT32 if you want universal compatibility and won’t store 4GB or larger files.
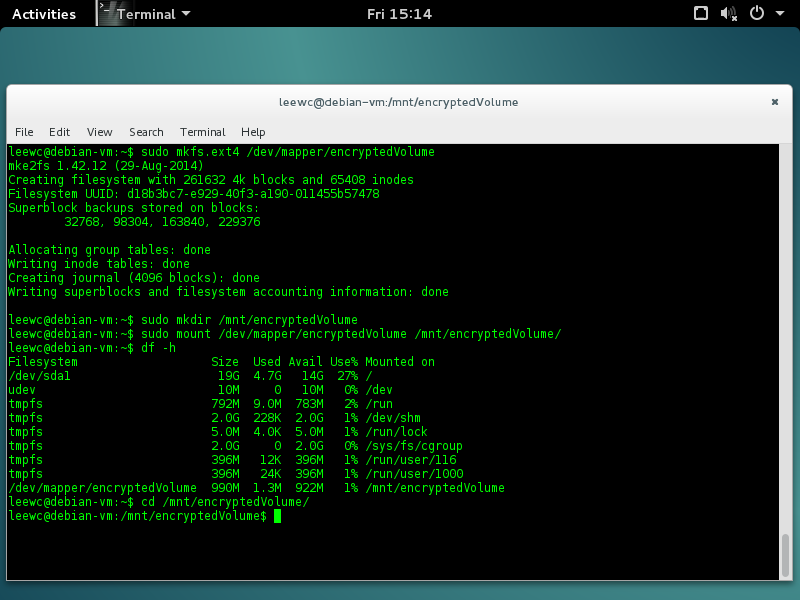
$ sudo mkfs.ext4 /dev/mapper/encryptedVolume
And then we mount it like so (change the paths and names as you wish):
$ sudo mkdir /mnt/encryptedVolume
$ sudo mount /dev/mapper/encryptedVolume /mnt/encryptedVolume
$ df -h
$ cd /mnt/encryptedVolume
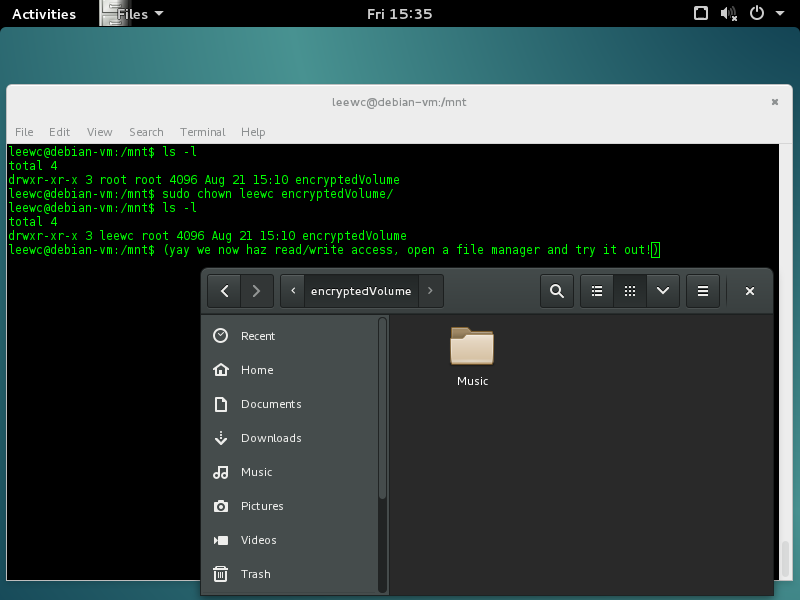
You can now go ahead and use your new disk. Copy what you want over. But wait! I have a permissions error. Darn. Well not a problem, you just need to assign permissions to yourself. 2 (using sudo so root assigns you the permissions) with:
$ sudo chown myUserName /mnt/encryptedVolume`
Note: If you wanted to navigate to your disk using Nautilus, at this point in time you’d need to do it through /mnt/encryptedVolume, which on Ubuntu you’d access through Computer -> mnt -> encryptedVolume, on Ubuntu 14.04 LTS which I later tested on, Unity also had a nice hard disk icon show up on the sidebar!
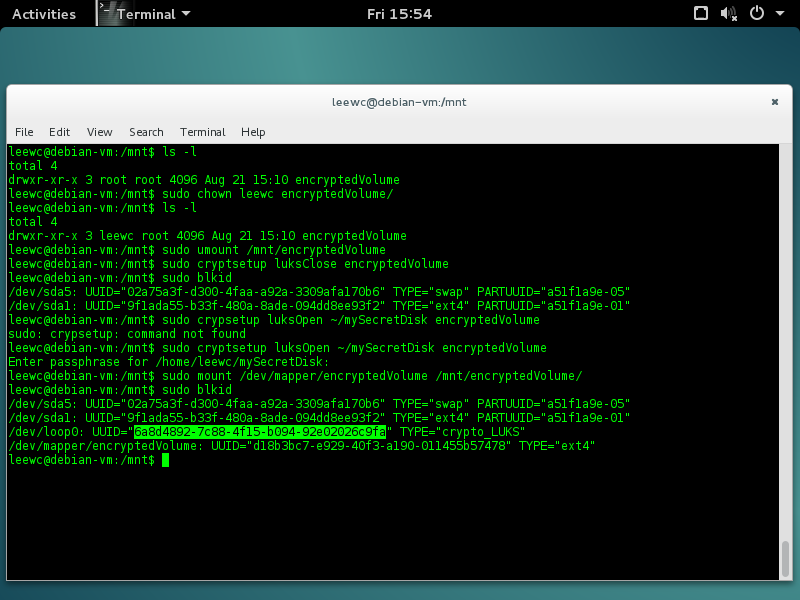
And when you’re ready, unmount and close the disk with:
$ sudo umount /mnt/encryptedVolume
nice, and then:
$ sudo cryptsetup luksClose encryptedVolume
6. Automatically mount the encrypted volume at boot and have system wait for password.
So we’re done. Wait, what? No? Nope. You’d be done if all you want was an encrypted file that can be mounted as a virtual hard drive, and then you could just easily mount later when you need to access the files with:
$ sudo cryptsetup luksOpen ~/mySecretDisk encryptedVolume
$ sudo mount /dev/mapper/encryptedVolume /mnt/encryptedVolume
But what we want here is to have Linux mount the encrypted volume for us at boot time using crypttab, so your system would wait for you to enter the password, and then once you do,
the virtual encrypted drive would be ready for the system by the time boot has completed. This would allow apps like Dropbox to sync the files inside the encrypted container/volume,
or keep your personal files inside the container, and as I explained, in the event of your computer being stolen or compromised, your data would be safe.
Here’s how to mount the encrypted volume at boot time:
Go ahead and mount the encrypted drive with:
$ sudo cryptsetup luksOpen ~/mySecretDisk encryptedVolume
$ sudo mount /dev/mapper/encryptedVolume /mnt/encryptedVolume
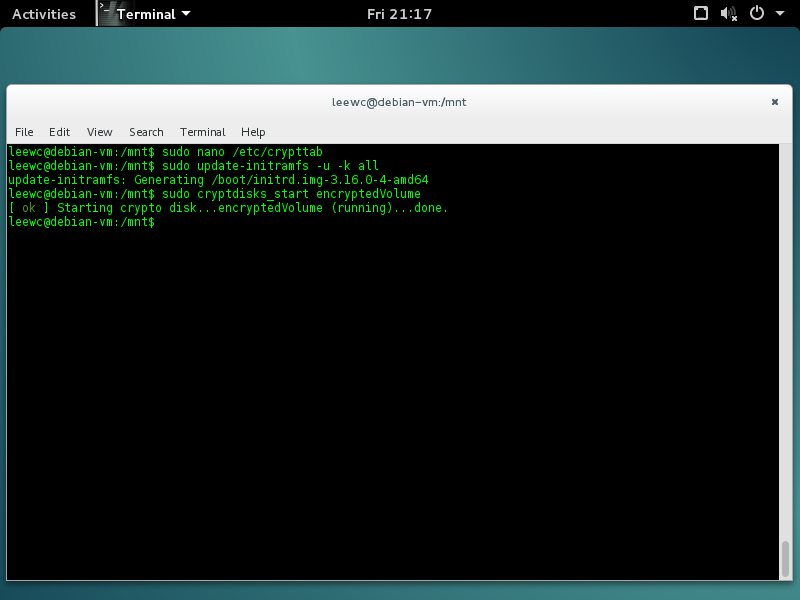
Now we need to add a drive mapping to crypttab sudo nano /etc/crypttab, and add the following in the /etc/crypttab file:
nameOfMapping /absolute/locationOfEncryptedContainer None luks`
We specify none for the keyfile as we want to supply the password at boot time. So for my example the following line gets added to /etc/crypttab and we have this:
<target name> <source device>         <key file>      <options>
encryptedVolume /home/leewc/mySecretDisk none luks
Then save the file with CTRL+O to write out and CTRL+X to exit. Your path must be absolute, as in you cannot use the ~ sign at all as crypttab will attempt to look in the root home directory for that file.
Also, make sure none was written as lowercase, on Debian None worked, but on Ubuntu it did not, it would fail with keyfile not found, as the cryptdisks_start script would think None was a file, no idea why.
Update the initial ramdisk with:
$ sudo update-initramfs -u -k all
# Sample output:
	update-initramfs: Generating /boot/initrd.img-3.13.0-63-generic
	update-initramfs: Generating /boot/initrd.img-3.13.0-62-generic
And then test what we have by executing:
sudo cryptdisks_start encryptedVolume
to check if the mapping exists, like in this screenshot right here:
On Ubuntu we get this output:
$ sudo cryptdisks_start encryptedVolume
  * Starting crypto disk...
  * encryptedVolume (running)...                                          [ OK ]
Lastly, we need to add this filesystem to fstab so it is mounted and ready to go for prime time.
$ sudo nano /etc/fstab
# add the following line below!
/dev/mapper/encryptedVolume /mnt/encryptedVolume ext4 defaults 0 2
You should edit that line accordingly, basically it’s:
/dev/mapper/<name_in_crypttab> /mnt/<mountpoint> <typeOfFileSystem> defaults 0 2
Execute sudo mount -a to validate your settings without a reboot. (If no error is printed you’re golden! Good job buddy.) See footnote 3 if you want to use UUIDs 3.
7. Reboot and Win!
We’re almost done. Go ahead and reboot, if all goes well, you should be asked to enter the passphrase for your encrypted volume. On Debian this is done without a pretty terminal and the output status messages might interfere with your password input, just give it a few tries.
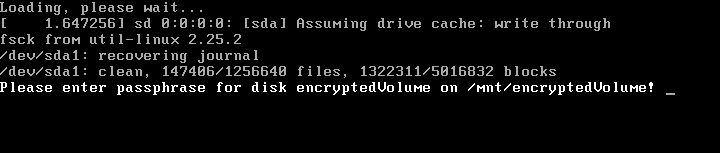
On Ubuntu and ElementaryOS though, is a beautiful and minimal UI asking you to enter the password. The system will not continue booting until you supply the right password, to ensure that the volume is ready and gets mounted in time. Here’s a photo I took while booting from my laptop, and not in a VM:

Additional References.
Additional References if you’re interested in taking security up a notch, (note that I have not tried these, and found them while making this guide) here are more reading material and guides:
- Full Disk Encryption is an option,
- Setting up an Encrypted Debian System
- Not encryption but it’s nice to have: Installing Plymouth on Debian 8
- Manual Full Disk Encryption
I’d like to also thank my friend Jeff for showing me a logical view of the insane world of encryption, and implementing what I want on GNU/Linux.
Also thanks to this AskUbuntu question, except we don’t use a keyfile for security purposes 4.
Lastly, it’s pretty cool that encryption is built into the Debian and ElementaryOS Freya installation, though this might not be what we want, it’s a great one click setup,
Hope this helps! Feel free to tweet me if it did! I spent quite a bit of time getting this out :) Footnotes are below.
-
The
iflag=fullblockis needed to avoid a partial read warning where dd doesn’t have enough bytes to work with. ↩ -
Here’s my AskUbuntu answer for more info on changing permissions on a LUKS encrypted device. ↩
-
You can also do
sudo blkidand copy the UUID for the device with theTYPE="crypto_LUKS"(as I have some highlighted text in the previous images), this allows you to identify the virtual container file using the UUID instead, and not the name mapped in/dev/mapper, I personally see this as unnecessary, because while a UUID allows me to move the file and only update thecrypttabfile when I do so, it’s just another step to updatefstab, and UUIDs might be confusing for some. However, if you were encrypting a physical drive, you should use the UUID as an identifier. ↩ -
Security purposes meaning if your laptop was stolen and the keyfile was with your laptop. Or someone steals your keyfile. Of course passwords have inherent issues, and you could be go on the defense and store the keyfile on a stick instead, or a Ubikey, but hey, this is as simple as it gets. ↩